 Ships Canada-wide
Cork Flooring Transitions & Trim Guide: T-Moldings, Reducers, End Caps and Stair Nosings
Finishing the edges of a cork floor properly is just as important as choosing the flooring itself. Doorways, adjoining floors, stairs, exterior doors and changes in floor height may all require different transition profiles.
Customers often ask us:
Do I need a T-Molding, Reducer, End Cap or Stair Nosing?
The correct choice depends on the type of cork flooring you are installing, the surface it meets, the difference in finished floor height, and where the transition is located.
This guide explains the most common situations and will help you determine which trim you need, what Cancork can custom manufacture, and how to calculate the quantity before ordering.
Quick Reference — Which Trim Should I Use?
| Installation Situation | Typical Solution |
|---|---|
| Floating cork meeting hardwood at approximately the same height | T-Molding |
| Floating cork meeting tile at approximately the same height | T-Molding |
| Floating cork meeting another hard-surface floor at approximately the same height | T-Molding |
| Floating cork meeting a noticeably lower floor | Reducer |
| Cork meeting carpet | Carpet transition / reducer, usually PVC or metal |
| Cork terminating at concrete, a doorway or another exposed edge | End Cap |
| Floating cork installed on stairs | Matching Stair Nosing + flooring for tread and riser |
| 6mm or 8mm glue-down cork requiring a transition | PVC, wood or metal transition |
| 6mm or 8mm glue-down cork installed on stairs | Third-party wood, PVC or metal stair-nosing profile |
| TechSlate requiring a transition or stair edge | Third-party PVC, wood or metal profile |
1. When Should I Use a T-Molding?
A T-Molding is intended primarily for cork flooring transitions between two hard flooring surfaces that finish at approximately the same height.
Typical examples are:
-
Cork to hardwood
-
Cork to engineered wood
-
Cork to laminate
-
Cork to vinyl plank
-
Cork to tile at a similar finished height
-
A doorway separating two floating-floor areas
T-Molding is also useful where an expansion break is required.
Floating cork flooring must have room to expand and contract. At a doorway or transition, the T-Molding covers the expansion space while allowing the floating floor underneath to move independently.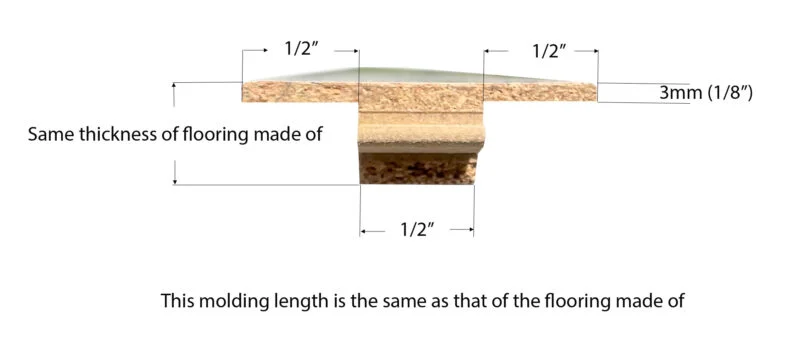
Important Installation Principle
The T-Molding should be secured at its centre to the subfloor below.
Do not glue the two upper sides or “wings” of the T-Molding directly to the floating flooring.
The cork floor on either side must remain free to move.
2. Can Cancork Make a T-Molding That Matches My Floor?
For most of our floating cork flooring collections, yes.
Our matching T-Moldings are custom manufactured using the corresponding flooring plank.
For example, if you purchase Salami floating cork flooring, the matching floating plank is used to produce the Salami T-Molding.
This provides a much closer match in colour and surface appearance than a generic transition purchased separately.
Because these pieces are custom manufactured:
-
Production normally requires approximately 2 weeks
-
They are special-order items
-
We recommend ordering them at the same time as your flooring
-
Custom-manufactured moldings cannot be returned or exchanged
For most products, you can locate the matching T-Molding from the flooring product page or search our website using the flooring colour/name plus “T-Molding.”
3. What About 6mm or 8mm Glue-Down Cork?
This is an important distinction.
Our matching T-Moldings and Stair Nosings are manufactured from floating flooring planks.
The 6mm and 8mm glue-down cork tiles are too thin and do not have the construction required to manufacture these custom profiles.
For this reason, Cancork does not offer matching custom T-Moldings or Stair Nosings made from our glue-down cork tiles.
What Should I Use Instead?
For glue-down installations, suitable transition products are normally available from local flooring and building-supply stores.
Depending on the installation, you may use:
-
PVC transition profiles
-
Metal transition profiles
-
Hardwood transitions
-
Oak or maple moldings that can be stained to coordinate with your cork
For stairs covered with glue-down cork, use a suitable wood, PVC or metal stair-nosing profile designed for the finished flooring thickness.
Taking a sample of your cork flooring with you when shopping locally can make it much easier to select a coordinating colour and the correct profile.
4. What About TechSlate?
TechSlate cannot be processed into our standard custom T-Molding or Stair Nosing profiles.
Its construction is different from our conventional floating cork planks, so matching custom T-Moldings and Stair Nosings are not available for TechSlate.
For a TechSlate installation, select an appropriate third-party transition according to the location and the finished floor heights.
Suitable options may include:
-
PVC profiles
-
Metal profiles
-
Wood transitions
For two approximately equal-height hard surfaces, look for an appropriate T-style transition.
Where the adjoining floor is lower, use a reducer.
For stairs, select a stair-edge or nosing profile suitable for the thickness and construction of the TechSlate installation.
5. How Long Are Cancork T-Moldings?
The length of a custom T-Molding is determined by one simple rule:
The molding is made from the original flooring plank, so its maximum length is the length of that plank.
For example, many of our natural cork floating planks are approximately 900 mm / 35.5 inches long.
A T-Molding manufactured from one of those planks will also be approximately 900 mm / 35.5 inches long.
Other Cancork collections use longer planks, and their corresponding moldings may therefore be longer.
Please check the dimensions shown for your specific flooring or matching molding before calculating your quantity.
Can You Make It Longer?
No. Because the T-Molding is transformed from an actual flooring plank, we cannot manufacture a single molding longer than the original plank.
If your opening is wider, multiple pieces can be joined.
6. What If My Opening Is Wider Than One T-Molding?
First measure the entire transition.
Divide the total length by the length of one matching T-Molding and round up to determine the number of pieces required.
For example:
60-inch opening ÷ 35.5-inch T-Molding = 2 pieces required
The second molding can be cut to complete the remaining length.
Joining Two T-Moldings
The connecting area on a finished T-Molding is relatively small. When two pieces are joined, we recommend using a small amount of suitable adhesive at the connection to improve stability and alignment.
The centre of the finished molding should then be secured to the subfloor.
Remember that the floating flooring itself must not be glued to the T-Molding.
7. Installing a T-Molding at the Correct Height
Our matching T-Moldings are made from the original flooring plank. During the manufacturing process, the plank is shaped into the required profile.
As a result, the centre stem of the finished T-Molding may not reach all the way down to the structural subfloor.
This is normal.
Suitable construction adhesive can be placed beneath the centre portion of the molding to support it and secure it to the subfloor.
Do not fill the expansion area with excessive adhesive. The floating flooring on both sides still needs room to move.
What If I Am Also Installing Cork Underlay?
Additional cork underlay raises the finished height of the floor.
If you install cork underlay beneath your floating floor, the distance between the bottom of the T-Molding and the structural subfloor may therefore be greater.
In this situation, simply filling a large gap with construction adhesive is not the best solution.
A practical method is to cut a small wood spacer or shim to the required thickness and secure it to the subfloor beneath the centre of the T-Molding.
The T-Molding can then be attached to this solid support.
The wood spacer should support only the centre of the molding.
Do not use the spacer to fill the expansion spaces underneath the sides of the T-Molding. Those areas must remain open so the floating cork floor can expand and contract normally.
8. Can T-Molding Be Used Between Cork and Carpet?
Generally, no.
Our matching cork T-Molding is intended for two relatively solid flooring surfaces at approximately the same height.
Carpet is soft and compressible and requires a transition designed to properly terminate and secure the carpet edge.
For a cork-to-carpet transition, we recommend purchasing an appropriate PVC or metal carpet transition/reducer from a local flooring supplier or building-supply store.
9. What If One Floor Is Lower? — Reducers
When two adjoining floors have noticeably different finished heights, you generally need a Reducer rather than a T-Molding.
A reducer creates a gradual transition from the higher floor to the lower surface.
Examples may include:
-
Cork to lower tile
-
Cork to concrete
-
Cork to lower hardwood
-
Cork to lower vinyl
-
Cork to carpet, depending on the installation
Does Cancork Make Matching Cork Reducers?
No.
Cancork can custom manufacture matching T-Moldings and Stair Nosings for compatible floating flooring, but we do not manufacture matching cork Reducers.
Reducers need to accommodate the actual height difference at each installation. The required height, slope and width can vary considerably from one project to another.
Where Can I Find a Reducer?
Reducers are commonly available from:
-
Flooring stores
-
Hardwood flooring suppliers
-
Home improvement and building-supply stores
-
Millwork and molding suppliers
Hardwood reducers are commonly made from species such as oak and maple and can often be stained to coordinate with the cork flooring.
PVC and metal profiles are also widely available and can be particularly useful for transitions involving carpet or unusual height differences.
We recommend taking a cork flooring sample and your finished floor-height measurements with you when selecting a reducer.
10. What Is an End Cap?
An End Cap is used where the cork floor terminates and needs a finished edge, rather than continuing into another floor at approximately the same height.
Typical applications include:
-
Exterior doors
-
Sliding glass doors
-
Fireplace hearths
-
Concrete areas
-
Garage entrances
-
Fixed objects
-
Other exposed flooring edges
The End Cap finishes the edge of the cork while maintaining the required expansion space.
11. How Do I Order an End Cap?
Ordering a matching End Cap is simple.
For compatible floating cork flooring, T-Molding and End Cap options are available directly through our online store.
Go to the matching molding product page for your flooring colour and select End Cap from the available options. Choose the quantity you need and add it to your cart just like any other product.
There is no need to email us separately or add special instructions in the order notes when the End Cap option is available on the product page.
Before Ordering
Make sure you select the molding that corresponds to your exact flooring colour and collection.
Also measure the total length of the area where the flooring will terminate so you can calculate the number of End Caps required.
Like our matching T-Moldings and Stair Nosings, End Caps are custom manufactured from the corresponding flooring material.
Please allow approximately 2 weeks for production.
12. Stair Nosing for Floating Cork Flooring
Stair Nosing creates the finished front edge of a cork-covered stair tread.
For compatible floating cork flooring, our matching Stair Nosings are custom manufactured from the corresponding flooring plank.
This allows the stair edge to coordinate closely with the flooring installed on the tread and throughout the room.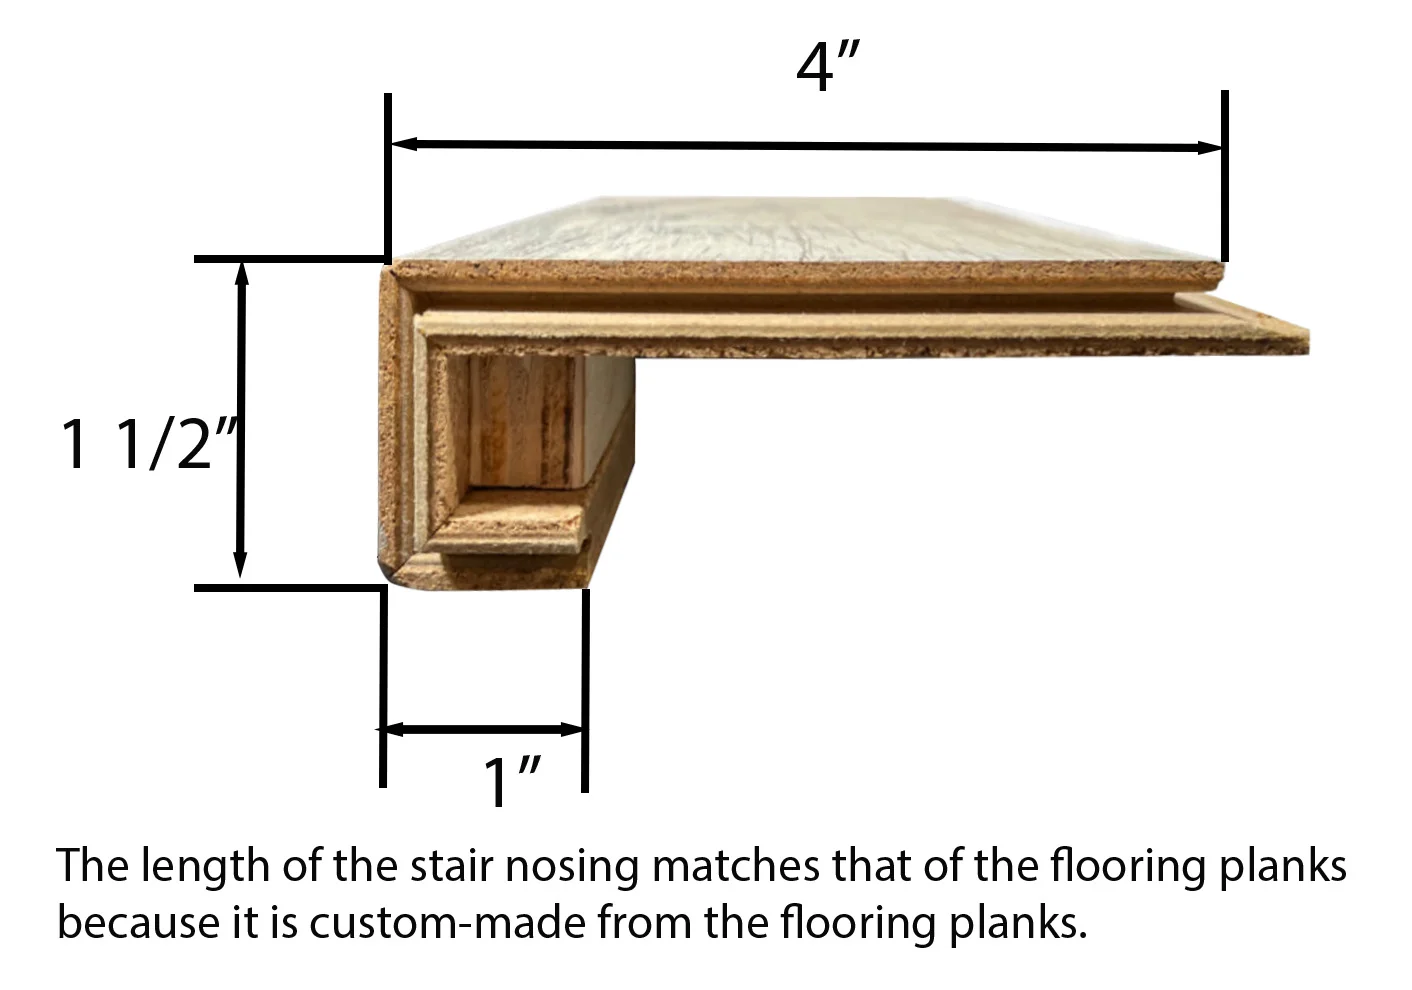
Like our matching T-Moldings and End Caps, Stair Nosings are custom-made products.
Please allow approximately 2 weeks for production.
13. How Long Is the Stair Nosing?
Stair Nosing follows the same rule as T-Molding:
Its length is determined by the length of the original flooring plank.
If the original plank is approximately 35.5 inches long, the Stair Nosing manufactured from that plank will also be approximately 35.5 inches long.
Collections with longer flooring planks can have correspondingly longer Stair Nosings.
Because the nosing is physically manufactured from the flooring plank, we cannot take a 35.5-inch plank and manufacture a single 40-inch or 42-inch Stair Nosing from it.
However, this does not mean you cannot use the flooring on a wider staircase.
Multiple nosing pieces can be joined.
14. What If My Stair Is Wider Than One Stair Nosing?
This is one of the most common questions we receive about stair installations.
If your staircase is wider than one Stair Nosing, two pieces can be connected to create the required total width.
The important part is to plan the entire staircase before cutting.
Do not automatically use one full nosing plus a very short piece on every stair.
Instead, use the remaining portion from one stair as the starting piece for the next stair whenever possible. Connect another nosing to it, cut the required width, and continue this pattern up the staircase.
This reduces waste and creates a better installation.
Minimum Recommended Joined Section: 6 Inches
For stability, we recommend keeping any joined Stair Nosing section at least 6 inches long.
Avoid creating very short 2-inch, 3-inch or 4-inch pieces at the end of a stair.
If your stair width would create a very short piece when combined with one full-length nosing, adjust your cutting layout so that both connected sections are adequately sized.
Think of the entire staircase as one cutting plan rather than calculating every step independently.
This also makes it much easier to reuse offcuts efficiently.
15. How Many Stair Nosings Should I Order?
For a staircase narrower than one full Stair Nosing, the basic calculation is simple:
1 stair = approximately 1 Stair Nosing
You will also need flooring material for the tread and, if desired, the riser.
If the upper floor is also being covered with cork, you may need an additional nosing where the staircase meets the upper floor.
Wider Stairs
If your stairs are wider than one nosing and require joined pieces, a useful preliminary estimate is:
Approximately 1.5 Stair Nosings per step
when the stair width is less than 1.5 plank lengths.
This is only an estimating method.
For a more accurate quantity, calculate the combined linear width of all stair edges and divide that measurement by the usable length of one Stair Nosing.
Then plan the cuts carefully so that:
-
Offcuts can be reused on following stairs
-
Joined sections remain at least 6 inches long
-
Some allowance remains for saw cuts and installation waste
16. Remember to Calculate Flooring for the Treads and Risers
Stair Nosings alone do not cover the staircase.
A typical cork-covered stair consists of:
Stair Nosing + Tread + Riser
The Stair Nosing forms the front edge.
A flooring plank connects to the nosing and covers the remaining tread surface.
If the vertical faces of the stairs will also be cork, flooring is required for each riser as well.
Therefore, when calculating your flooring order, remember to add the square footage required for:
-
Stair treads
-
Risers
-
Landings
-
Any other cork-covered stair surfaces
These flooring quantities are separate from the number of Stair Nosings required.
17. Stair Installation Basics
The Stair Nosing and the flooring used on the tread should be connected using their matching locking profile before being securely installed on the stair.
Unlike a standard floating-floor installation, flooring installed on stairs must be securely glued down.
Plan the complete staircase before beginning, particularly when several nosing pieces need to be cut and joined.
If the upper level will also be finished with the same cork flooring, plan the direction of the upper flooring and the final top Stair Nosing before starting the staircase.
Can I Order Samples of T-Molding, End Cap or Stair Nosing?
No. We do not provide colour-matched samples of custom T-Moldings, End Caps or Stair Nosings.
These trim pieces are custom manufactured from the corresponding floating flooring material after an order is placed. They are not regular stocked products available for sampling.
If you would like to confirm the colour and surface appearance before ordering, we recommend ordering a sample of the flooring itself. Because the matching trim is made from the corresponding flooring material, the flooring sample is the best way to evaluate the colour and finish.
Please finalize your flooring selection before ordering custom T-Moldings, End Caps or Stair Nosings.
Should I Order My Flooring and Custom Moldings Together?
You have two options, depending on whether you need the flooring immediately.
Option 1 — Order Flooring and Custom Trim Together
If you can wait approximately 2 weeks, we recommend placing your flooring and custom T-Molding, End Cap and/or Stair Nosing on the same order.
We will hold the flooring while the custom pieces are being manufactured. Once the moldings are ready, the complete order can be shipped together.
This is generally the most economical option because you avoid paying for a second shipment.
Option 2 — Ship the Flooring First
If you would like to receive the flooring sooner and begin your project while the custom trim is being manufactured, place the flooring and custom moldings as two separate orders.
We can then ship the available flooring first.
Your T-Molding, End Cap and/or Stair Nosing will be custom manufactured separately and shipped once production is complete, normally in approximately 2 weeks.
Please keep in mind that because these are two separate shipments, additional shipping charges will apply to the second order.
Which Option Should I Choose?
If your project schedule allows you to wait approximately two weeks, ordering the flooring and custom trim together is usually simpler and more economical.
If receiving the flooring quickly is more important, separate the flooring and custom trim into two orders so the flooring does not need to wait for the custom pieces.
Before Ordering Your Trim — Check These Measurements
Before ordering a T-Molding, Reducer, End Cap or Stair Nosing, we recommend confirming the following:
-
Which Cancork flooring are you installing? Floating cork, glue-down cork or TechSlate?
-
What surface will the cork meet?
-
Are the two finished flooring surfaces the same height or different heights?
-
What is the total length of the doorway or transition?
-
Are you installing additional cork underlay?
For stair projects, also measure:
-
Exact finished stair width
-
Total number of stairs
-
Tread dimensions
-
Riser dimensions
-
Landings
-
Any open sides or unusual stair details
Accurate measurements make it much easier to determine the correct transition and quantity before ordering.
If you are still unsure which trim is appropriate, email Cancork with your flooring name, measurements and a photo of the transition area. We can help determine which option is suitable for your installation.
 Flooring
 Cork Underlayment
 Supplies & Guides